Garbage Disposal Leaking From the Bottom: Gasket Fix
Seeing water collect under your sink is stressful—especially when the cause seems impossible to spot. If your garbage disposal leaking from bottom, the most common reason is a failed internal gasket or seal inside the motor housing. In some cases, it’s a cracked housing or a connection that has worked loose. The good news: you can narrow it down quickly and fix what’s actually failing.
For more help, see our GE Garbage Disposal Leaking: Stop Every Leak and Backup guide.
Confirm the Leak Is Really Coming From the Bottom
Check the sink flange, discharge pipe, and reset button area
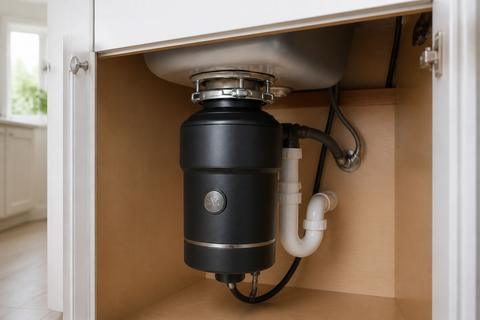
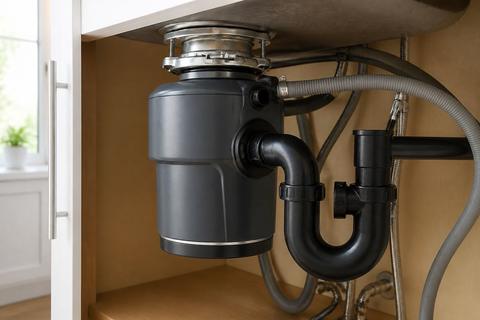
Before you remove anything, identify the leak location by inspecting the most common wet spots. Start at the sink flange (where the disposal meets the sink), then check the discharge pipe and the joints where the plumbing connects. Next, look around the underside area near the red overload reset button on the bottom of the motor housing. Bottom leaks usually show up as water forming directly under the lower rim or dripping from the motor housing seam, not from the top mounting area. If water appears near the plumbing joints, that points to a connection or gasket in the discharge line instead of the disposal’s internal seals.
Use a dry paper towel to trace the first drip
Tracing with moisture is the fastest way to prevent misdiagnosing the source. Dry the entire underside of the disposal and surrounding cabinet surfaces with a towel, then keep everything dry for a few minutes. Place a white paper towel under the likely leak points: one section under the sink flange area, one under the side/discharge joints, and one centered under the bottom rim/motor housing. Turn on a small flow of water and run the disposal briefly. The first spot where the paper towel darkens shows the actual leak path.
Tell bottom leaks apart from top and side leaks
Use the leak pattern to separate top, side, and bottom failures. A leak at the sink flange usually means the plumber’s putty seal or mounting ring has loosened. A leak at the side typically involves the dishwasher hose clamp or the discharge tube gasket. Water dripping from the bottom housing means an internal seal has failed, and the unit must be replaced, not repaired. If you see moisture lower than the motor housing seam or water accumulating under the base directly after running water, treat it as a bottom seal failure.
Find the Most Likely Cause
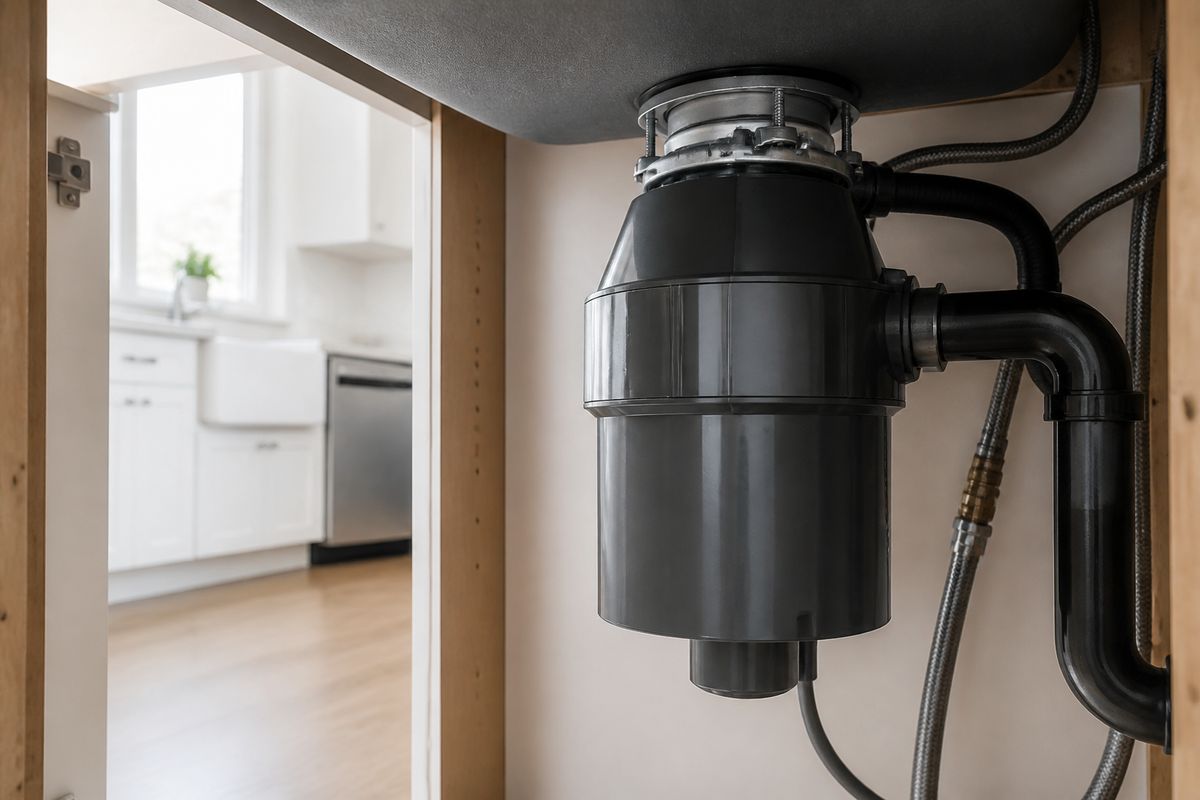
Inspect the gasket and mounting ring for wear
If your leak is near the top connection, the mounting gasket or mounting ring is the most likely culprit. Turn off the water supply feeding the sink and wipe everything dry again so you can see fresh moisture. Check for gaps, uneven compression, or a seal that has hardened or separated. Loose mounting rings can allow water to climb upward into the disposal connection area and then drip downward. If the gasket looks intact but loose, you may be able to correct the leak by tightening the mounting hardware without replacing parts. If the seal surface is visibly deformed or cracked, plan to replace the gasket.
Look for cracks in the disposal housing
A cracked disposal body changes the repair decision immediately. Inspect the disposal housing—especially around the bottom rim and the seams where the lower housing meets the motor body—for any hairline cracks, crusted corrosion, or wet tracks that don’t originate from the plumbing connections. If you find a fracture, water can leak under pressure and pooling can damage electrical components. Even a gasket replacement won’t seal a crack reliably. When the motor area is wet or the housing shows damage, replacement is the correct long-term fix.
Check the dishwasher inlet and discharge connection
If you have a dishwasher, part of the leak can come from where the dishwasher drains into the disposal. Look at the dishwasher inlet nipple and the discharge connection area under the sink. If the leak is on the side, a failed dishwasher hose clamp or a discharge tube gasket is the common cause. For GE-style setups, make sure the dishwasher connection is seated correctly and that the plastic knockout plug inside the dishwasher inlet nipple was removed during installation; if it’s still in place, drainage backs up and can increase leak pressure. Remove and reinstall the discharge tube and clamp if the seal surface looks flattened or misaligned.
Turn Off Power and Prepare to Work Safely
Shut off the breaker and verify the unit is dead
Safety comes first with disposal repairs. Shut off the disposal’s power at the breaker (not just the wall switch). Then verify the unit is dead by pressing the wall switch—nothing should happen (no hum, no click, no vibration). If the unit was recently used and seems warm, wait a few minutes to avoid burns from hot components. If you smell burning or see sparks, keep power off and stop—electrical damage may be present. Never work under the sink with the disposal still energized.
Clear the cabinet and place a towel or bucket underneath
Before you loosen anything, protect the cabinet from water and debris. Pull stored items out of the cabinet so you have full access to the disposal underside. Place a heavy towel around the disposal base and position a bucket beneath the most likely leak point so any remaining water or drips are caught. This also helps you see fresh leaks if they restart after you open connections. Keep power off while you do this so you don’t accidentally create water movement while components are exposed.
Gather the basic tools and replacement parts
Use the right tools so you don’t damage fasteners or seals. Have a flashlight, adjustable pliers, a screwdriver (flat and Phillips), a wrench for mounting hardware, and a bucket/towel ready. If you’re replacing a gasket or seal, get the correct replacement for your disposal’s brand and model number. Many replacement gaskets come as a kit for the sink flange/mounting ring or for dishwasher/discharge connections. Keep a rag handy for cleanup as you remove the old seal and position the new one.
Fix a Leaking Gasket or Seal
Tighten loose connections before replacing parts
When the leak source is the top connection or a discharge joint, tightening can fix it. With power still off, dry everything thoroughly and inspect the mounting ring and any visible clamps. If you see looseness at the sink flange mounting ring, tighten it evenly so the flange sits flat against the sink. For dishwasher-related side leaks, check the hose clamp and discharge tube fit; reseat the connection and tighten the clamp firmly. Don’t overtighten plastic parts—tighten until snug and aligned, then re-check for fresh moisture at the seam.
Replace a worn gasket or mounting seal
If tightening doesn’t stop the leak, replace the failing seal. For a top flange leak, remove the mounting hardware as needed, clean the mating surfaces, and remove the old gasket without gouging the metal or sink lip. Install the new gasket centered and seated correctly, then reassemble the mounting ring and fasteners evenly. For dishwasher/discharge side leaks, remove the discharge tube or inlet connection parts, replace the affected gasket/seal, and reinstall the tube with the clamp properly positioned. Use the model-specific parts to ensure the seal geometry matches your disposal.
Reassemble and test for drips
After reassembly, restore the area to a clean, dry state. Turn water on at a low flow first and run it briefly while watching the connection seams you worked on. Then run the disposal for a short period and watch for moisture returning along the sink flange, side joints, and the disposal body seam. The goal is to see no new drips at the exact leak point. If you still see water coming from the bottom housing seam, the internal seal has failed and a gasket swap won’t resolve it—replacement is the appropriate fix.
Handle Common Disposal Problems While You Are There
Free a jammed or stuck impeller
A jam can look unrelated to leaks, but it’s common during repair time and can cause vibrations that worsen seals. With power off at the breaker, press the red overload reset button on the bottom of the motor housing until it clicks. If the disposal still won’t spin, cut power again and clear the jam. For a jammed impeller, insert a 1/4-inch hex (Allen) wrench into the hex socket on the center underside and work it back and forth through a full rotation to free the impeller plate before pressing reset again. Never put your hand into the grind chamber—use tongs or pliers instead.
Restore power to a disposal that will not turn on
If the disposal won’t turn on after you shut off power for repair, you may need to reset the overload. Find the red overload reset button on the bottom of the motor housing and press it in until it clicks. Wait a few minutes if the unit feels hot; the overload can trip when the motor overheats. Then switch power back on at the breaker and try the wall switch. GE continuous-feed models (model numbers starting with GFC, like GFC520N/GFC1020N) run from the wall, while batch-feed models (starting with GFB, like GFB760N) run only when the stopper cap is inserted and twisted in the sink opening.
Clear a backup and check the drain path
Backups can push water and waste back toward the disposal inlet, increasing leak chances at connections. Turn off power, then check the drain path from the sink into the disposal for standing water and clogs. If you have a dishwasher, verify it drains properly through the disposal rather than backing up into the sink. When connecting a dishwasher to a new GE disposal, the plastic knockout plug inside the dishwasher inlet nipple must be punched out and removed from the grind chamber first—if it’s still in place, drainage fails and backups follow. Clear obstructions and correct any connection issues that can trap water.
Know When Repair Is Not Worth It
Decide between a repair and a full replacement
Choose replacement when the leak is structural or electrical risk exists. If water is dripping from the bottom housing seam (not the flange or side joints), that indicates an internal seal failure; repairing the gasket won’t stop it long-term. If multiple seals have failed, or the unit is heavily corroded and old, replacement is more cost-effective than chasing repeated leaks. Use this decision rule: if the cause is internal failure or housing damage, replace the disposal. If the cause is a loose mounting ring, a failed gasket at a connection, or a straightforward discharge leak, repair the seal and reassemble.
Watch for electrical cord leaks and housing cracks
Electrical leaks are a safety stop. If you see water near the electrical cord, unplug the unit or shut off power immediately and do not use the disposal—this can indicate damaged housing or seal that needs replacement. Cracks in the disposal housing also mean repair is not a reliable fix. Hairline cracks can widen under vibration and water pressure, causing continued leakage and potential electrical exposure. If the motor area is wet, treat it as a replacement case and do not attempt seal-only repairs.
Use the model number to find compatible parts
When replacing gaskets or seals, compatibility matters more than brand alone. Locate the disposal model number on the unit’s label—many GE model numbers start with GFC for continuous-feed units (e.g., GFC520N, GFC1020N) and GFB for batch-feed units (e.g., GFB760N). Use that model number to buy the correct mounting gasket kit and any dishwasher/discharge gasket or tube components. Installing the wrong gasket shape or size can leave gaps and cause leaks to return quickly. Having the exact model number also helps confirm whether your disposal design supports the specific seal you’re planning to replace.
Prevent Future Leaks
Avoid overloading the disposal and running it dry
Overloading increases vibration and pressure on seals, accelerating failures. Run the disposal with a steady flow of water, and avoid cramming waste through when the unit is struggling. Never run the disposal dry—without water, waste doesn’t flush and the unit can stall, overheat, and trip the overload reset. If the disposal sounds strained or the grinding slows dramatically, stop and clear the load before continuing. Keeping a consistent water stream reduces the chance of improper drainage and connection stress that leads to leaks.
Keep grease, fibrous food, and bones out of the drain
Certain materials damage the interior and clog drains that increase backpressure. Keep grease away because it solidifies in pipes and disposal components. Avoid fibrous foods like celery-heavy scraps, and remove bones or large hard items that can jam or crack internal parts. When the disposal clogs and backs up, leaks can appear at the flange, dishwasher inlet, or discharge joints as water finds the weakest seal. Proper food disposal reduces jams, reduces vibration, and extends gasket life.
Inspect connections during routine kitchen maintenance
Make it a habit to visually check the sink flange area and the dishwasher/discharge connections. During routine cleanups under the sink, dry the cabinet surfaces and look for early signs of moisture at the same seams where leaks previously appeared. If you have to disconnect the dishwasher or remove the disposal in the future, reseat and align seals carefully and ensure the correct knockout plug removal is done during dishwasher hookups. Catching a small looseness early prevents the leak from progressing to a seal failure at the bottom housing.
Frequently Asked Questions
Why is my garbage disposal leaking from the bottom?
Bottom leaks usually come from a worn internal gasket or seal, a cracked housing, or a failed connection at the disposal body. If the leak starts below the motor housing, replacement is often the practical fix.
Can I fix a garbage disposal leaking from the bottom myself?
Yes, if the leak is from a loose connection or a replaceable gasket and you are comfortable shutting off power and working under the sink. If the housing is cracked, replacing the unit is usually better than repairing it.
How do I tell whether the leak is from the top or the bottom?
Dry the disposal completely, then run a small amount of water and watch where the first moisture appears. Water at the sink flange indicates a top leak; water dripping from the lower body points to a bottom leak.
Should I replace the gasket or the whole disposal?
Replace the gasket if the leak is limited to a seal or mounting connection and the disposal housing is intact. Replace the whole unit if the body is cracked, the motor area is wet, or the disposal is old and heavily corroded.
What if my garbage disposal is leaking from the electrical cord?
Unplug or shut off power immediately and do not use the disposal. A leak near the electrical cord can mean a damaged housing or seal, which is a safety issue and often means replacement is needed.