How to Remove an InSinkErator Garbage Disposal Safely
If you’re dealing with a disposal that’s jammed, leaking, or simply too old to keep, knowing how to remove insinkerator garbage disposal safely can save you from mess and injury. The wiring and plumbing connect in tight spaces, so taking the right precautions matters. Follow the steps below to disconnect power, release the unit, and leave your sink area ready for a new disposal (or a properly capped drain).
For more help, see our How to Install, Replace, or Remove an InSinkErator Disposal guide.
Before You Start: Safety, Tools, and Sink Setup
Turn off power at the breaker and test the switch
- Locate your home’s electrical panel and switch the breaker labeled for the kitchen disposal to OFF.
- With the breaker off, flip the wall switch for the garbage disposal ON and listen for anything—there should be no sound and no hum.
- If the disposal has a dedicated wall switch only, still turn off the breaker first; never rely on the wall switch alone.
- Keep your hands away from the underside wiring until you’ve confirmed power is off.
Gather the right tools and protective gear
Wear eye protection and a pair of rubber gloves. Have a bucket, towels, a flashlight, and a small putty knife or rag on hand for cleaning. You’ll also want basic plumbing tools: adjustable pliers, a flat-head screwdriver, and a wrench set for the discharge and mounting hardware. If you have a jam, use the 1/4-inch hex “Jam-Buster” wrench that comes with many InSinkErator units, since it fits the hex socket on the underside.
Clear the cabinet and prepare for water drips
Pull everything out from under the sink. Place a bucket on the cabinet floor area and lay towels around the disposal’s base to catch any water that drains when you loosen connections. Turn the sink faucet on briefly to reduce any residual pressure in the lines, then shut it off. If your cabinet is cramped, slide a stool or kneeling mat in place so you don’t strain while supporting the unit during removal.
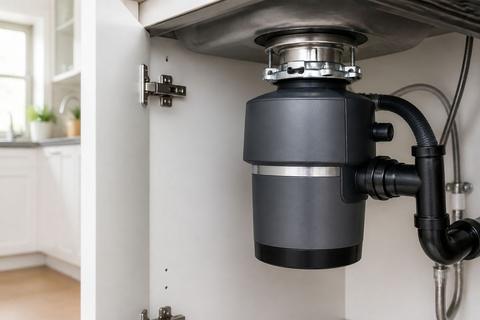
Understand the Disposal and Mounting Style
Identify the InSinkErator model and connection points
Find the model label or documentation for your unit (often on the side or underside of the motor housing). Identify three connection zones: the power connection (cord plug or hardwired), the drain/discharge plumbing line (the pipe leaving the disposal), and the mounting assembly above the unit that locks the disposal to the sink. Knowing whether your disposal is a Badger-style replacement unit or an Evolution unit helps you plan around what’s repairable and what’s meant to be swapped.
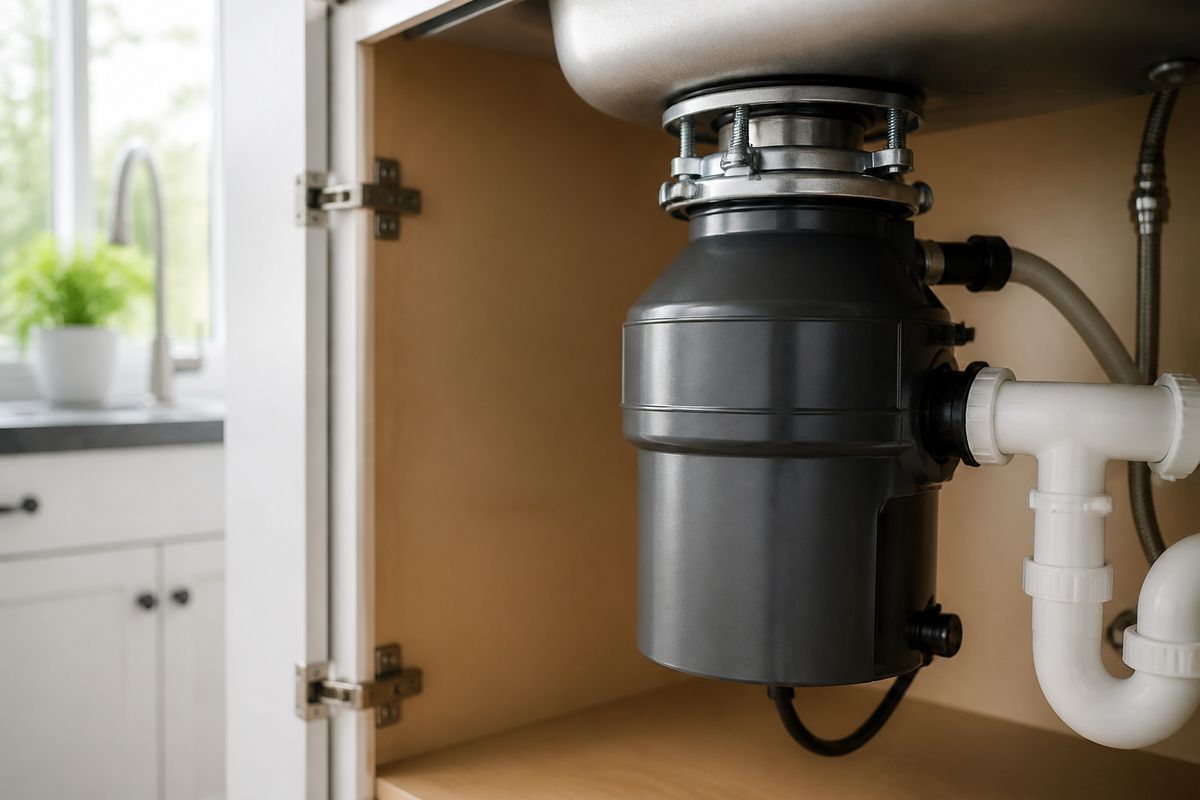
Locate the drain cover, discharge pipe, and mounting ring
Under the sink, locate the sink flange area (where the disposal mounts to the drain opening), then find the mounting ring or retaining assembly that locks the unit in place. Follow the discharge pipe—this is the pipe that connects from the disposal to the drain line. The drain cover is typically part of the sink assembly above the disposal, and the mounting ring sits directly beneath it. Clear visibility here prevents stripping bolts or loosening the wrong fittings.
Check whether the unit is hardwired or plugged in
Look under the cabinet for the power connection. If you see a plug-in cord to an outlet, your disconnect step is simply to unplug it after the breaker is off. If you see direct wiring secured with a junction box and wire nuts, treat it as hardwired and disconnect power at the breaker before you touch anything. Hardwired units require extra caution: don’t tug conductors; loosen and separate only after power is confirmed off.
Disconnect the Disposal From Power and Plumbing
Unplug the cord or disconnect hardwired power safely
- With the breaker still OFF, reach for the cord connection if your disposal is plugged in and unplug it from the outlet.
- If it’s hardwired, remove the junction box cover after power is confirmed off, then separate the wires as needed (follow your local wiring code and best practices).
- Avoid pulling on wires—unfasten connections cleanly.
- Use a flashlight so you can see exactly what you’re disconnecting.
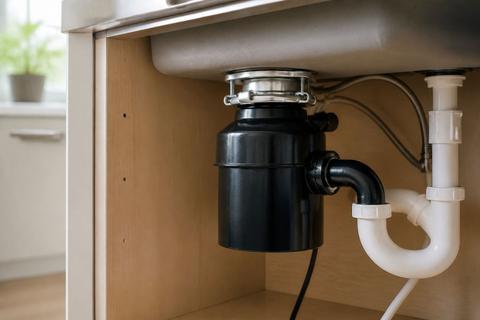
Loosen the discharge pipe and drain connections
- Place the bucket under the disposal connections and position towels around the area.
- Use pliers or a wrench to loosen the clamps or fittings that connect the disposal’s discharge pipe and any dishwasher drain components to the disposal inlet.
- Carefully pull the discharge connection apart to prevent water from splashing inside the cabinet.
- Let any remaining water drain into the bucket before you fully remove the piping.
Remove the dishwasher knockout plug only if needed
If you connect or remove dishwasher hoses at the disposal, check the dishwasher inlet on the side of the grind chamber. New InSinkErator disposals ship with the dishwasher inlet sealed by a plastic knockout plug.
- If a dishwasher drain hose needs to connect, use a screwdriver to knock out the plug.
- Remove the knocked-out plug from inside the grind chamber before proceeding.
- If you are not reinstalling the dishwasher connection, leave the plug in place so the inlet stays sealed.
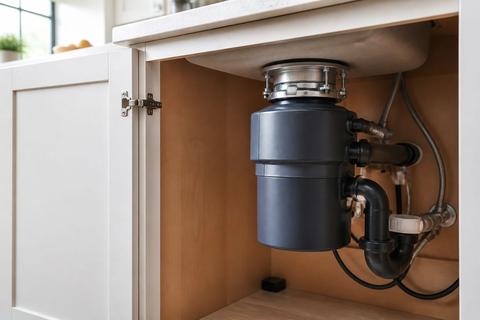
Release the Disposal From the Mounting Assembly
Support the unit before loosening the retaining ring
Before you loosen anything above the unit, support the disposal with one hand (or use a second person). The mounting ring holds the disposal’s weight; once you begin loosening, the unit can drop suddenly. Keep the bucket and towels ready, since some water will spill when the unit separates. If you’re working alone, use a step stool for balance and maintain a firm stance so you don’t twist the pipes.
Rotate the mounting ring to unlock the disposal
Most InSinkErator mounting assemblies release by rotating the ring.
- Locate the retaining ring/mounting ring under the sink flange.
- While continuing to support the disposal, rotate the mounting ring in the direction that unlocks it (typically a counter-rotation depending on the model).
- Loosen enough for the disposal to release from the sink collar without forcing it.
- If it won’t move, stop and recheck power/plumbing looseness—forcing can damage the sink flange.
Lower the disposal carefully and drain remaining water
Once unlocked, lower the disposal straight down so you don’t stress the discharge connections you already loosened. Tilt only after the unit is detached from the mounting assembly. Let water drain slowly into the bucket to prevent splashing. Keep the discharge and drain openings controlled with towels. If you find resistance, it usually means the mounting ring isn’t fully released—don’t pull hard; rotate again until it frees.
Clean, Inspect, and Prepare for Reinstallation or Replacement
Clean the sink flange and mounting surfaces
With the disposal removed, wipe down the sink flange area and mounting surfaces thoroughly. Remove any old gasket material, residue, and debris so the new unit seals correctly. Use a non-abrasive cleaner and a rag or soft scrub pad; avoid gouging metal. If old putty remains, scrape it off carefully. A clean, flat mounting surface is what prevents leaks around the flange and keeps the disposal securely seated.
Inspect the gasket, splash guard, and drain cover
Inspect the gasket under the sink opening, along with any splash guard components that come with your disposal or sink assembly. Look for cracks, tears, hardened rubber, or corrosion around the mounting points. Also check the drain cover and related parts for warping or missing pieces. If you see rust where the disposal mates, clean it fully and replace any gaskets or worn sealing parts before installing a new unit.
Decide whether to reinstall, replace, or cap the drain
If you’re reinstalling a disposal, replace worn components (especially gaskets) and ensure the mounting ring and discharge connections match the new unit’s setup. If the unit is leaking from internal seal failure (often indicated by water from the bottom vent holes), replacement is the correct fix because internal seals aren’t meant to be service-repaired by homeowners. If you remove the disposal permanently, cap the drain properly with a tested drain cap and sealant designed for sink drain assemblies.
Common Problems During Removal
Free a jammed or corroded mounting ring
If the mounting ring won’t rotate, first ensure power is OFF at the breaker. Corrosion and old residue can seize the mechanism. Apply penetrating lubricant to the ring area and allow it to soak, then try rotating again while supporting the unit. For internal jams that prevent the disposal from operating, use the Jam-Buster wrench on the hex socket in the underside center—work it back and forth until the flywheel turns freely. Then press the red overload reset button on the bottom until it clicks and stays in before restoring power.
Stop leaks from trapped water or loose fittings
Leaks during removal come from two places: trapped water in the grind chamber and loose plumbing fittings you haven’t fully separated. Place a bucket and towels before loosening discharge lines, then drain the remaining water slowly by tilting only after the disposal detaches. For leaks around connections, retighten clamps on the dishwasher hose (if present) and re-seat discharge tube gaskets if they look flattened or damaged. Diagnose leak location: water at the top means the sink flange needs re-seating; water on the side indicates a hose/clamp or discharge gasket issue.
Know when to call a plumber or electrician
Call a plumber if you discover damaged drain piping, a compromised sink flange, or a persistent leak that doesn’t resolve after you reseat and replace gaskets. Call an electrician if you find exposed wiring issues, a damaged junction box, or you can’t safely disconnect hardwired power without risking contact with conductors. If the disposal is hardwired and the wiring arrangement doesn’t match what you can safely handle, stop and get professional help rather than forcing the connection.
Frequently Asked Questions
Do I need to shut off the breaker before removing an InSinkErator disposal?
Yes. Turn off power at the breaker first, then confirm the unit will not start. This is the safest way to avoid electric shock or accidental activation. Even if you plan to unplug a cord, always treat the breaker as the primary shutoff so you don’t energize the disposal while you’re working underneath the sink.
Can I remove an InSinkErator garbage disposal by myself?
Many homeowners can remove it with basic tools if the wiring and plumbing are simple. If the unit is hardwired, seized, or leaking into the cabinet, it may be safer to hire a professional. Hardwired electrical work and persistent leak sources can turn a quick removal into a safety risk if you aren’t set up to handle wiring and sealing correctly.
What should I do with water left inside the disposal?
Place a bucket or towels underneath before loosening any pipes. Tilt the unit only after it is detached and drain the remaining water slowly to avoid spills. This keeps water from running down into cabinet materials and reduces cleanup.
How do I clean the disposal area after removal?
Wipe the sink flange, mounting ring, and cabinet base with a non-abrasive cleaner. Check for rust, old putty, and worn gaskets before installing a new unit or drain cover. Cleaning and inspection ensures the next installation seals properly and reduces the chance of leaks around the sink opening.