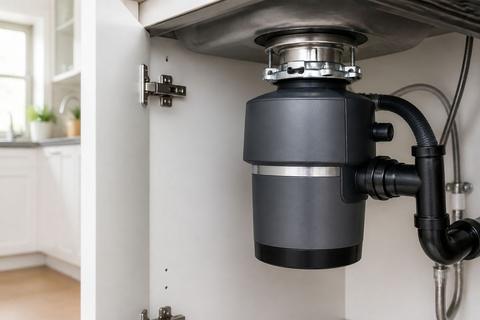
How to Replace an Old InSinkErator Garbage Disposal
When you’re searching for how to change insinkerator garbage disposal, it’s usually because the old unit won’t drain, leaks, jams constantly, or makes loud, unpleasant noises. Replacing it can restore fast cleanup and stop messes at the sink. With the right prep and safe disconnect steps, you can swap the unit cleanly and get everything working again.
For more help, see our How to Install, Replace, or Remove an InSinkErator Disposal guide.
Before You Replace the Disposal
Confirm the problem is the disposal, not the sink or drain
Before you buy parts, verify the issue is inside the disposal. Start by running water and turning the wall switch: if the disposal won’t drain but the sink drains after temporarily removing the disposal’s discharge (or if water flows freely down the drain line without the unit powered), the disposal is the problem. Check for standing water, foul odors, or repeated clogs that happen only when the disposal is on. Also look for leaks around the sink flange and the underside of the unit—water that appears with the disposal connected points to a sealing or mounting failure rather than a drain clog.
Check the model, power type, and mounting style
Match the replacement to your existing setup so the mounting ring, electrical connection, and discharge alignment work. Confirm the exact InSinkErator model label on the bottom or side of the unit, then note whether it is plug-in (under-sink cord with a plug) or hardwired (wired to a junction). Next, check the mounting type: most use the standard sink flange + mounting assembly, but you must measure the opening and look for adapter requirements. The two main model lines are Badger (builder-grade: Badger 1, Badger 5, Badger 5XP, Badger 15SS) and Evolution (Excel, Compact, Supreme). Badger units are sealed and are generally replaced rather than repaired internally.
Gather the tools, parts, and safety gear
Make the job smooth by collecting everything first. You’ll typically need a screwdriver (for knockout plugs and clamps), adjustable pliers, channel-locks, a putty scraper, and a bucket/towels for water. For disposal installation, have plumber’s putty (or the disposal’s recommended sealant), a replacement mounting flange if yours is corroded, and a new dishwasher discharge tube gasket if you reconnect the dishwasher. If your disposal has a jam, InSinkErator ships a 1/4-inch hex “Jam-Buster” wrench with the unit—keep it handy. Wear safety glasses and work gloves, and plan to shut off power at the wall switch and breaker.
Remove the Old InSinkErator Unit
Cut power and disconnect the dishwasher if needed
Safety comes first. Turn off the disposal wall switch, then switch off the circuit breaker for the disposal at the electrical panel. Verify the switch is dead by attempting to run the unit—no hum, no sound. If your dishwasher connects to the disposal, detach the dishwasher inlet: locate the dishwasher hose under the sink and disconnect the hose from the disposal’s dishwasher inlet. New InSinkErator disposals ship with the dishwasher inlet sealed by a plastic knockout plug; when reconnecting later, that plug must be removed before the hose is attached.
Detach the drain lines and electrical connection
Clear the workspace and control leaks. Place a bucket under the disposal discharge area and wipe up standing water. Loosen and disconnect the discharge tube from the disposal outlet, then remove any securing clips or rubber fittings. For hardwired units, disconnect the electrical leads in the junction box according to the wiring colors and local code practices; cap wires with wire nuts and keep them separated. For plug-in units, simply unplug the cord (only after power is off). Avoid pulling on wires—release the electrical connection at the proper junction.
Release the disposal from the sink flange
Support the disposal before releasing it. With a helper (recommended), grasp the underside of the unit, then loosen the mounting assembly. Many InSinkErator disposals use an unlock mechanism: use the correct wrench or turn the mounting ring per your unit design until the disposal drops slightly. Once it’s released from the sink flange, lower it carefully and set it aside. Keep the mounting ring and hardware so you can remove and replace parts as needed; damaged or corroded hardware should not be reused.
Inspect and Prep the Mounting Area
Inspect the sink flange and replace it if worn
The sink flange is the seal point—if it’s corroded, warped, or damaged, a new disposal can leak even when installed correctly. Inspect the flange surface where the disposal gasket seats and look for pitting, rust-through spots, or gaps. If you see corrosion or a flange that doesn’t sit flat, replace it. Replacing is also important when past installations used old sealant or the flange has been reseated repeatedly. A flange replacement typically means removing the disposal remnants, scraping old putty, and installing a new flange with fresh plumber’s putty (or the manufacturer’s specified seal method).
Check the rubber insert and splash guard for damage
Look at the rubber splash guard/baffle at the sink opening and the rubber insert or bushing around the mounting area. Cracks, tears, missing sections, or loose fit can increase noise, allow debris to escape, and contribute to leaks at the opening. Clean the parts and reseat them only if they remain intact and properly seated. If anything is damaged beyond cleaning—especially cracks or chunks—replace the rubber insert/splash guard. A tight, correctly seated splash guard reduces splatter and helps the disposal operate quietly.
Clean old putty, corrosion, and debris from the opening
A dirty mounting surface prevents a good seal. Scrape away all old plumber’s putty, gasket material, and mineral buildup from the sink opening and underside. Remove corrosion flakes from the flange area so the new seal can contact clean metal. Use a putty scraper and a rag with a cleaner appropriate for metal surfaces. Also clear debris from the disposal opening and discharge area so the new unit sits fully. When the mounting surface is clean and dry, the new flange and gasket seal properly.
Install the New InSinkErator Disposal
Set the new mounting ring and flange securely
Start with the hardware that controls alignment and sealing. If you replaced the sink flange, install it with fresh plumber’s putty (per the flange instructions) and tighten it according to the design. Then set the disposal mounting ring assembly onto the underside of the sink—tighten fasteners so the ring is stable and does not wobble. Ensure the discharge outlet aligns with your existing plumbing run to avoid kinks or stress on the discharge tube. A mounting ring that shifts during installation can cause leaks or a poor fit between the flange and the unit.
Lift and lock the disposal into place
With power still off, position the disposal under the sink. Route the wiring and hoses so they aren’t pinched when you raise the unit. Align the disposal’s locking tabs with the mounting ring, then lift it upward into place until it engages. Rotate or secure the locking mechanism per your unit style until the disposal is held tight and centered. Keep a firm grip and use a helper if the unit is heavy. Once locked, the unit should feel stable without needing you to “hold it up” while you reconnect lines and wiring.
Reconnect the drain, dishwasher inlet, and wiring
Reconnect the discharge tube using the correct gasket and clamp. Make sure the tube has a proper seal and correct orientation, then tighten the clamp without deforming the gasket. If you connect the dishwasher, remove any factory plastic knockout plug from the disposal’s dishwasher inlet before attaching the hose—otherwise the dishwasher won’t drain and can back up. For electrical: connect wires in the junction box for hardwired units using matching colors, then cap with wire nuts and secure the cover. For plug-in models, plug in after connections are made.
Test for Leaks, Noise, and Startup Issues
Run water and check every connection for drips
Restore power only after everything is reconnected and the unit is locked in. Turn on the faucet and let water run into the disposal, then inspect the new connections: the sink flange area, the discharge tube/clamp, and the dishwasher inlet connection if applicable. Look closely for drips along the underside and around rubber gaskets. If you see water at the top where the disposal meets the sink, reseat the flange seal with fresh plumber’s putty; a side leak points to a clamp or discharge tube gasket issue. Tighten fittings only in small increments so you don’t distort gaskets.
Test grinding performance with a small load
With water running, start the disposal and feed a small amount of typical waste, such as soft food scraps. Watch the sound and drainage: the disposal should pull waste in and grind without excessive vibration. Stop if you hear grinding where nothing enters, or if waste backs up in the sink. If you have a dishwasher feed line, ensure it drains normally by running the dishwasher briefly and confirming there is no standing water buildup at the sink. Grinding performance should be smooth and consistent after the first short test.
Reset the unit if it hums, jams, or will not start
If the disposal hums but does not grind, the flywheel is jammed—not the motor. Turn off power at the switch or breaker, then free the jam with the hex wrench from below: insert it into the center underside hex socket and work it back and forth until the flywheel turns a full revolution. Use tongs to remove any object—never hands. Then press the red overload reset button on the bottom of the unit: with wall switch OFF, press it in until it clicks and stays in. If it pops back out immediately, wait about 10 minutes for the motor to cool and press again; restore power only after resetting.
When to Repair, Replace, or Call a Pro
Decide whether a flange, gasket, or full replacement makes sense
Not every failure needs a full unit swap. If the disposal turns on but leaks occur, repair the sealing system first: replace a worn sink flange, reseat with fresh plumber’s putty, and use new rubber gaskets for the dishwasher inlet and discharge tube. If the disposal is sealed (Badger line) and shows internal failure, full replacement is the practical choice. However, if the unit is damaged at the mounting assembly, the splash guard is cracked, or the connections keep failing due to corrosion, replacement becomes the safer long-term solution.
Know the signs of electrical or plumbing problems
Electrical trouble can look like: no power, repeated breaker trips, frequent reset-button pops, or a disposal that won’t start even after resetting. Plumbing trouble can look like persistent clogs that happen regardless of disposal activation, water backing up into the sink, or a discharge tube leak that sprays or drips from clamps and joints. Diagnose leaks by location: water at the top means the sink flange needs re-seating; a side leak means tightening the dishwasher hose clamp or replacing the discharge tube gasket; dripping from the bottom vent holes means the internal seal failed and the unit needs replacement.
Understand when professional installation is the safer option
Call a pro when you’re dealing with unsafe wiring access, damaged plumbing runs, or a sink flange that’s heavily corroded and won’t come out cleanly. Professional help is also warranted if the unit repeatedly trips breakers after the overload reset, if wiring is exposed or too short to safely reconnect, or if you discover misaligned discharge routing that could create leaks. If you have to modify electrical circuits or cannot confidently identify whether your unit is plug-in or hardwired, professional installation is the safer option.
Frequently Asked Questions
How do I know if my InSinkErator garbage disposal needs replacement?
Common signs include frequent jams, persistent leaks, loud grinding, slow drainage, repeated resets, or a unit that no longer powers on reliably. If you’ve already reseated a loose connection, replaced gaskets, and confirmed power at the switch/breaker, and the disposal still fails consistently, replacement is the next step.
Can I replace an InSinkErator disposal with another brand?
Yes, but the mounting system, flange size, and plumbing connections must be compatible. Matching the existing sink opening and discharge alignment is important, and you may need an adapter mounting kit or a different discharge configuration to ensure the unit seals and fits properly.
Do I need to replace the sink flange when installing a new disposal?
Not always, but it is a good idea if the flange is corroded, leaking, or difficult to seal. A worn flange can cause recurring leaks even with a new disposal, because the seal is formed at the flange-to-sink interface.
What is the rubber insert on an InSinkErator disposal?
It is the splash guard or baffle at the sink opening. It helps reduce splashing and noise, and it may need cleaning or replacement if it is cracked, loose, or worn.
Is replacing an InSinkErator garbage disposal a DIY job?
Often yes, if you are comfortable with basic plumbing and electrical work and can safely shut off power. If the wiring, piping, or mounting hardware is damaged, a professional is safer.