How to Connect Garbage Disposal to Drain Pipes
If your sink backs up or you’re upgrading to a garbage disposal, you need a clean, leak-free way to connect it to the drain pipes. Knowing how to connect garbage disposal to drain pipes correctly prevents nasty odors, slow draining, and water leaks under the cabinet. With the right fittings and a careful install, you can hook everything up in an afternoon.
For more help, see our GE Garbage Disposal Installation: Removal, Wiring, and Setup guide.
What You Need Before You Start
Confirm the sink and drain layout
Before disconnecting anything, match your sink layout to the disposal’s required connection points. Identify the sink drain: the disposal connects to the sink drain opening through a mounting flange and to the drain piping via a trap and discharge line. Look under the cabinet and note the current trap type (P-trap), the tailpiece length, and where the dishwasher inlet line would tie in (if present). Also check whether your disposal is continuous-feed (runs from the wall switch) or batch-feed (GE GFB models only run when the stopper cap is inserted and twisted). If the existing drain piping is damaged, plan to replace sections—misaligned or cracked fittings create leaks and slow drainage.
- Turn off the disposal wall switch and unplug the disposer if it has a cord.
- Clear the cabinet space and take a photo of the current trap, tailpiece, and drain routing.
- Measure how far the trap arm connects to the wall drain and note the outlet direction needed for the discharge elbow.
Gather the disposal, trap, and fittings
Collect everything before you start so you don’t end up forcing connections in the wrong orientation. You’ll need the garbage disposal unit, its included mounting hardware (mounting ring, flange, and gasket/seal), a discharge elbow/outlet tube matched to the disposal discharge size, and the drain trap and tailpiece parts that fit your plumbing. If your trap is missing or old, replace it with a new trap kit designed for under-sink drains. Have plumber’s putty ready if your flange uses it, plus the correct sealant for the threads you will use (thread sealant, not excess caulk). Confirm you have a dishwasher connection component if you’ll tie in the dishwasher hose.
- Lay out: mounting ring, sink flange/gasket, discharge elbow/outlet tube, trap parts, and any included stoppers/seals.
- Confirm the wall drain pipe size and trap connection size match your fittings (commonly 1-1/2 in).
- Keep a towel and bucket handy for residual water in the trap.
Check for missing or worn parts
A successful disposal-to-drain connection depends on the right seals and hardware. Inspect the sink flange area for chips or corrosion, and verify the disposal discharge connection gasket/elbow seat is present. If you’re reusing older plumbing parts, check the trap for cracks, loose joints, and brittle nuts—replace anything that looks warped or stripped. If you’re missing parts, do not improvise with random adapters; match replacement pieces to the exact disposal model number stamped on the unit label. For GE units, model numbers start with GFC for continuous-feed (e.g., GFC520N, GFC1020N) and GFB for batch-feed (e.g., GFB760N), and mounting hardware and stoppers are model-specific.
- Check the sink mounting area for smooth surfaces where gaskets contact.
- Verify the disposal discharge elbow and any rubber gasket are included and uncracked.
- Find the model number on the disposal label and confirm any replacement parts match it.
Remove the Old Drain Setup
Disconnect the trap and tailpiece
Start by removing the existing under-sink drain components so you can install the disposal and align the new trap correctly. Put a bucket under the trap because some water always remains. Loosen the slip-joint nuts to detach the P-trap from the tailpiece and the trap arm. If the nuts are stuck, use penetrating lubricant and give it a few minutes, then turn the slip nuts by hand or with an adjustable wrench on the flats—avoid twisting fragile plastic. Once the trap is free, remove the old tailpiece that connects to the sink strainer opening.
- Place a bucket under the P-trap.
- Loosen the slip-joint nuts connecting the trap to the tailpiece and trap arm.
- Lift off the trap and tailpiece as one assembly if it comes free easily.
Take out the old sink strainer or flange
With the trap off, remove the sink strainer assembly. Depending on your setup, a typical sink strainer may be held by a locknut from below and a strainer flange above. If it’s caulked or sealed with plumber’s putty, work a putty knife around the seam and loosen the locking nut. Remove the strainer and any old gasket remnants so the disposal mounting flange can sit flat. Clean the sink opening thoroughly—debris and hardened putty create gaps that cause leaks.
- From under the sink, loosen and remove the locknut holding the strainer in place.
- Push the strainer up from above and pull it out once the locknut is free.
- Scrape old gasket/putty residue from the sink opening surface.
Prepare the drain opening for the new unit
A correct seal starts with a clean, correctly sized opening. Confirm your sink opening size matches the disposal mounting system and that the disposal mounting ring can sit evenly against the underside of the sink. Remove any remaining debris, old gasket pieces, or obstructions in the flange area. If your disposal kit includes a new gasket, install it now so it doesn’t shift during mounting. Ensure the mounting area is dry and smooth before tightening any hardware.
- Clean the sink opening and underside mounting area until bare, smooth metal is exposed.
- Install the disposal gasket/insulating ring if your kit calls for it.
- Check that mounting hardware seats without wobble before tightening.
Mount the Garbage Disposal to the Sink
Install the sink flange and mounting ring
Mounting the disposal to the sink properly prevents leaks and vibration. Place the sink flange/gasket assembly into the sink opening from above, then position the mounting ring beneath the sink as directed by your disposal model. Tighten mounting bolts/screws evenly to compress the gasket without over-stressing the sink or flange. The goal is a firm, even seal that doesn’t rock when you gently press it. If your kit uses plumber’s putty, apply a thin ring where indicated—too much putty squeezes out and can interfere with the gasket.
- Insert the sink flange through the drain opening and seat it in place.
- Position the mounting ring and tighten it evenly using the included hardware.
- Ensure the flange is centered so the disposal will align to the drain discharge.
Lift and lock the disposal into place
With the flange and mounting ring installed, attach the disposal housing. Lower the disposal unit so the three mounting tabs/lugs engage with the mounting ring. Twist/rotate per the kit instructions until it locks in place—most disposals require a firm twist to fully seat the unit. While you lift, keep the discharge outlet oriented the direction you want before locking, because rotating after sealing is harder and can strain connections. Never force the unit: if it won’t seat, the mounting ring isn’t aligned.
- Hold the disposal by the housing, not the wiring or discharge.
- Lower it onto the mounting ring and align the connection points.
- Twist/lock the unit until it stops securely in the designed position.
Support the unit while tightening the connections
After the disposal locks on, you still need to secure it and connect the discharge and plumbing. Support the weight of the disposal with your hands or a strap so the threads and drain connections don’t bear the entire load. Tighten the mounting hardware according to your disposal instructions, then proceed with connecting the discharge elbow and trap alignment. Keeping the unit steady reduces stress on gaskets and seals, which is the most common cause of under-sink leaks after install.
- Keep one hand under the unit or use a temporary support to prevent sagging.
- Tighten the disposal mounting components only after the unit is fully seated.
- Stop if anything shifts—re-seat the unit instead of forcing fittings.
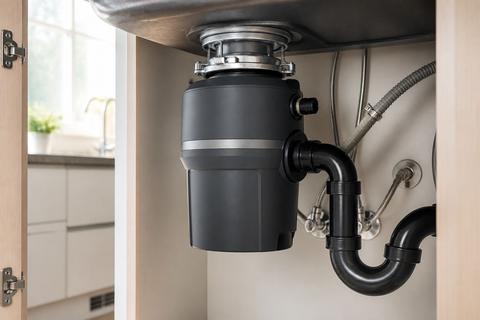
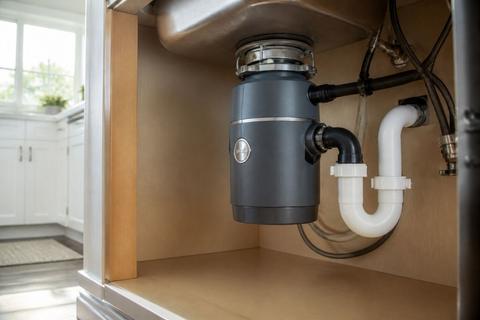
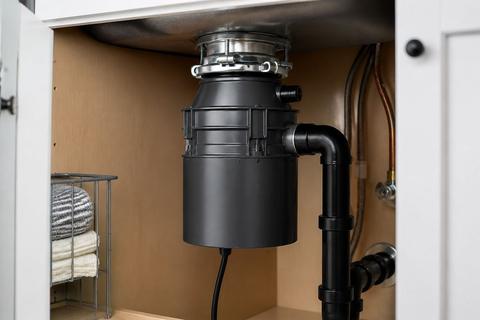
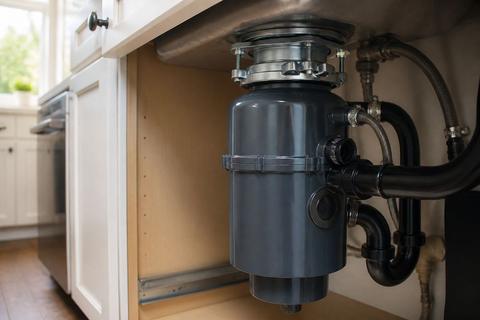
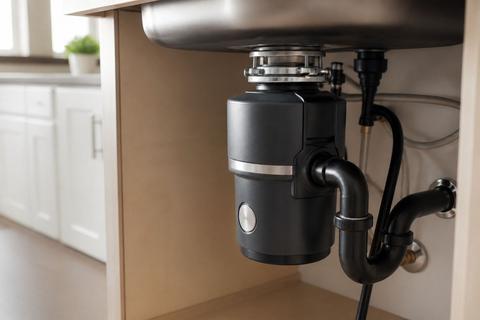
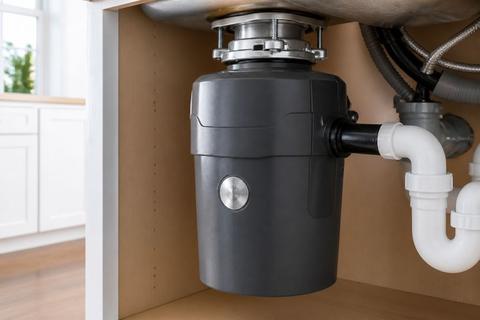
Connect the Disposal to the Drain Pipes
Attach the discharge elbow or outlet tube
The discharge outlet is what carries wastewater from the disposal to the plumbing. Attach the discharge elbow or outlet tube to the disposal discharge using the gasket provided in the kit. Orient the elbow so it lines up with the trap arm without needing to twist the pipe by force. Insert the elbow/tube into the disposal outlet, seat the gasket fully, and tighten using the included clamp or fasteners. Avoid overtightening—overtightening can deform the gasket and cause leaks.
- Fit the gasket onto the disposal outlet.
- Push the discharge elbow/outlet tube into the outlet until seated.
- Tighten the clamp/connection just enough to stop movement—do not crush the gasket.
Plumb the trap and align the drain lines
Your trap must align properly so water flows freely and waste doesn’t pool. Use a P-trap setup that connects the disposal’s discharge line to the wall drain via the trap arm. Dry-fit the trap and tailpiece first: if the trap arm is too long, too short, or angled, adjust by swapping to the correct-length pipe pieces rather than bending. Connect the trap using the proper slip-joint nuts and ensure the disposal-to-trap connection doesn’t twist. Proper alignment prevents slow draining and reduces leaks at slip joints.
- Dry-fit the trap pieces between the discharge connection and wall drain.
- Adjust lengths so the trap sits level and the joints line up without twisting.
- Reconnect and tighten slip-joint nuts by hand first, then snug with a wrench on flats.
Seal threaded joints without overtightening
Not all joints need sealant. Use sealing compound or plumber-approved thread sealant only on threaded connections that are designed for it; don’t pack sealant into slip joints. For threaded joints, apply a thin layer to the male threads and tighten until snug—overtightening can crack fittings or squeeze gaskets out of place. If you see sealant flooding the joint interior, you used too much. Keep the discharge and trap connections clean so you can identify leaks later if any appear.
- Apply thread sealant to the male threads only (thin coat).
- Tighten the threaded fittings snugly, then stop—do not over-torque plastic.
- Wipe away excess sealant so it doesn’t interfere with flow or hide leaks.
Set Up the Dishwasher and Drain Path
Knock out the dishwasher inlet only if needed
If your dishwasher will drain through the garbage disposal, connect the dishwasher hose to the disposal inlet. Many disposals have a plastic knockout plug inside the dishwasher inlet nipple. Only remove it when you need dishwasher drainage; leaving it intact prevents odors and backflow. With power off, remove the knockout using a screwdriver to punch it out of the inlet nipple and remove the plug from inside the grind chamber. If you skip this step or leave the plug in place, the dishwasher will not drain and backs up into the sink.
- Locate the dishwasher inlet on the disposal body.
- Use a screwdriver to punch out the plastic knockout plug from inside the inlet nipple.
- Remove the plug completely so water can pass through.
Route the hose to prevent clogs and backups
Install the dishwasher drain hose so it runs to the disposal with minimal bends and no kinks. The dishwasher hose should connect to the disposal inlet securely using the correct clamp. Route the hose so it rises and falls naturally without sagging where food and water can collect. Keep the hose higher than the disposal inlet when possible to reduce backflow risk, and avoid routing it in a way that puts the weight of the hose on the disposal connection.
- Connect the dishwasher hose to the disposal inlet and tighten the clamp.
- Route the hose with smooth turns—no sharp bends or kinks.
- Support the hose so its weight doesn’t pull on the disposal fitting.
Keep the drain slope and venting in mind
A garbage disposal drains through gravity and proper venting, so a correct drain slope matters. If the trap arm or discharge line rises too high or runs uphill unnecessarily, waste can accumulate and lead to slow draining. Also ensure the venting in your existing plumbing system is intact—improper venting can cause gurgling and sluggish flow. Use the correct trap-arm length and keep the slope consistent toward the wall drain. When rerouting, keep the setup within the ranges your disposal/trap kit is designed for.
- Position the trap arm so it slopes down toward the wall drain.
- Avoid stretching hoses or pipes that create an upward “hump.”
- Keep vented plumbing components connected as they were in the original setup.
Test for Leaks and Drain Problems
Run water through the sink and disposal
Start the leak test by running a steady flow of water into the sink and operating the disposal. Turn on water first, then switch on the disposal to flush the discharge line. Watch under the sink around the flange, mounting ring area, trap joints, and discharge elbow connections. If you notice drips that start only when the disposal runs, focus on the corresponding joint—vibration often exposes weak seals. If water pools in the sink or drains slowly, stop and correct alignment or obstruction rather than repeatedly trying to force flow.
- Fill the sink with water and run water into the drain area.
- Turn on the disposal and let it run for a short flush cycle.
- Observe all connection points under the cabinet during the run.
Check the flange, trap, and discharge connections
Inspect each likely leak point methodically. A leak at the sink flange usually means the putty/gasket/mounting ring seal loosened—tighten mounting hardware only to the extent your kit allows and re-seat if needed. Leaks at the side often point to the dishwasher hose clamp or discharge tube gasket area. Check the P-trap slip joints for dampness, and confirm the discharge elbow connection is seated and clamped firmly. If you find moisture, dry the area, run water again briefly, and pinpoint exactly where it starts.
- Look for moisture at the sink flange/mounting ring seam.
- Check around the trap nuts and where the trap meets the wall drain.
- Inspect the discharge elbow/outlet tube gasket and clamp area.
Clear slow drains and freshen a dirty drain pipe
If drainage is slow, address the plumbing path rather than assuming the disposal is faulty. Common causes include debris in the discharge elbow, a misaligned trap, or left-over grime that initially restricts flow. Run cold water and disposal again to clear light debris. If the drain pipe is dirty, use a disposal-safe cleaner or flush method appropriate for your setup; avoid harsh chemicals that can damage plumbing. For minor clogs near the disposal outlet, clearing the elbow path after shutting off power often restores flow quickly.
- Turn off power, then remove any visible obstruction at the disposal outlet area if accessible.
- Run cold water and test disposal drainage again.
- Use a disposal-safe cleaner or approved flush product to remove buildup in the drain pipe.
When to Repair, Replace, or Reconfigure
Replace worn disposal parts or sink stopper pieces
If the disposal runs but certain functions fail—like unusual leaking or repeated jamming—replace the worn components rather than rebuilding the entire unit. Common replacement targets include the discharge elbow gasket, mounting ring seal parts, dishwasher inlet knockout cover components, and sink stopper pieces (especially on batch-feed units that rely on the stopper cap to start). Match parts to the disposal model number on the label. GE model numbers start with GFC for continuous-feed units and GFB for batch-feed units, and the correct stoppers and mounting hardware differ by model.
- Identify the failing area: leak location, jam pattern, or missing stopper component.
- Use the exact disposal model number to order compatible replacement parts.
- Swap only the failed gasket/seal/stopper hardware and reinstall using the kit’s instructions.
Know when the unit is beyond repair
Some symptoms indicate internal failure that replacement fixes faster than repair. If the disposal leaks from the bottom housing consistently, the internal seal has failed and the unit must be replaced, not repaired. If the unit hums but does not spin and power is off, a jam is likely: insert a 1/4-inch hex (Allen) wrench into the hex socket in the center of the underside and rotate a full turn to free the impeller plate, then press the red overload reset button until it clicks (after power remains off). If the unit won’t respond after jam clearing and reset, replace the unit.
- If water is dripping from the bottom housing, replace the disposal (internal seal failure).
- If it hums but doesn’t spin: cut power, use the 1/4-inch Allen wrench to free the impeller, then reset.
- If the unit is silent when switched on: let it cool a few minutes, then press the red overload reset button until it clicks.
Convert the setup back to a regular sink drain
If you remove the disposal permanently, reconfigure the plumbing into a conventional sink drain. Remove the disposal and install a standard sink drain strainer and tailpiece matched to your sink opening and plumbing size. Reconnect the trap directly to the sink drain using the appropriate connector and seal. Replace the parts that were part of the disposal connection path (discharge elbow and disposal outlet fittings) with the correct non-disposal piping. Finish by reseating the trap so it sits properly and does not twist.
- Remove the disposal unit and any disposal-specific discharge plumbing.
- Install a standard drain strainer and tailpiece to replace the disposal outlet connection.
- Reconnect the P-trap to the sink tailpiece and route the trap arm to the wall drain normally.
Frequently Asked Questions
Can I connect a garbage disposal to existing sink plumbing myself?
Yes, you can connect a garbage disposal to existing sink plumbing yourself if your sink drain layout is standard and the trap/discharge connections are in good condition. The process comes down to three critical tasks: mounting the disposal correctly at the sink flange, aligning the trap so it doesn’t twist, and sealing the disposal discharge and drain joints without damaging gaskets. Start by confirming your disposal model uses the standard mounting setup for your sink opening. Then install the discharge elbow and connect the P-trap using proper slip-joint fitment and the correct gasket at threaded or clamped connections.
Do I need a special drain strainer for a garbage disposal?
Yes. A garbage disposal uses its own mounting flange and sink connection hardware rather than a standard basket strainer. Your disposal kit includes the sink flange/mounting assembly that mates with the disposal’s mount. Using the wrong strainer can prevent the disposal from locking properly and can cause leaks around the sink opening. The exact parts depend on the sink type and the disposal model, so match the flange and mounting hardware to the disposal model number printed on the label.
Why does my garbage disposal drain slowly after installation?
Slow drainage after installation is usually caused by a plumbing connection issue rather than a broken disposal. The most common causes are a misaligned trap/arm, a clogged discharge elbow, debris left in the drain line, or too much sealant squeezing into a fitting and restricting flow. Check that the trap sits level and lines up without twisting the discharge connection. If the discharge elbow has debris or an obstruction, remove power and clear the path. Also confirm you didn’t leave the dishwasher knockout plug in place if you connected the dishwasher.
Can I convert a garbage disposal back to a regular drain?
Yes. You can convert a garbage disposal back to a regular drain by removing the disposal and installing a standard sink drain strainer and tailpiece. Then reconnect the trap directly to the sink tailpiece as a conventional under-sink plumbing setup. Replace disposal-specific discharge parts with the correct non-disposal plumbing components so your P-trap and trap arm route properly to the wall drain. Seal the flange appropriately so the sink drain no longer leaks at the sink opening.
What if my GE disposal parts are missing or damaged?
Match replacement parts to the exact GE disposal model number before buying. GE disposals use model-specific components, especially mounting hardware, sink stopper pieces, and the discharge elbow/gaskets. GE continuous-feed models start with GFC (for example, GFC520N, GFC1020N) and batch-feed models start with GFB (for example, GFB760N). Look up the parts using that model number so you get the correct inlet/discharge accessories and the right seals to keep the drain connection leak-free.